Floor Visualization with AI: Building a Roomvo Alternative Using SegFormer and Texture Mapping
23,dec,2025:- "I am building a SAAS that will allow you to visualize any texture on any image (including indoor visualization), heres the demo https://viz2d.com/demo
👋 Introduction
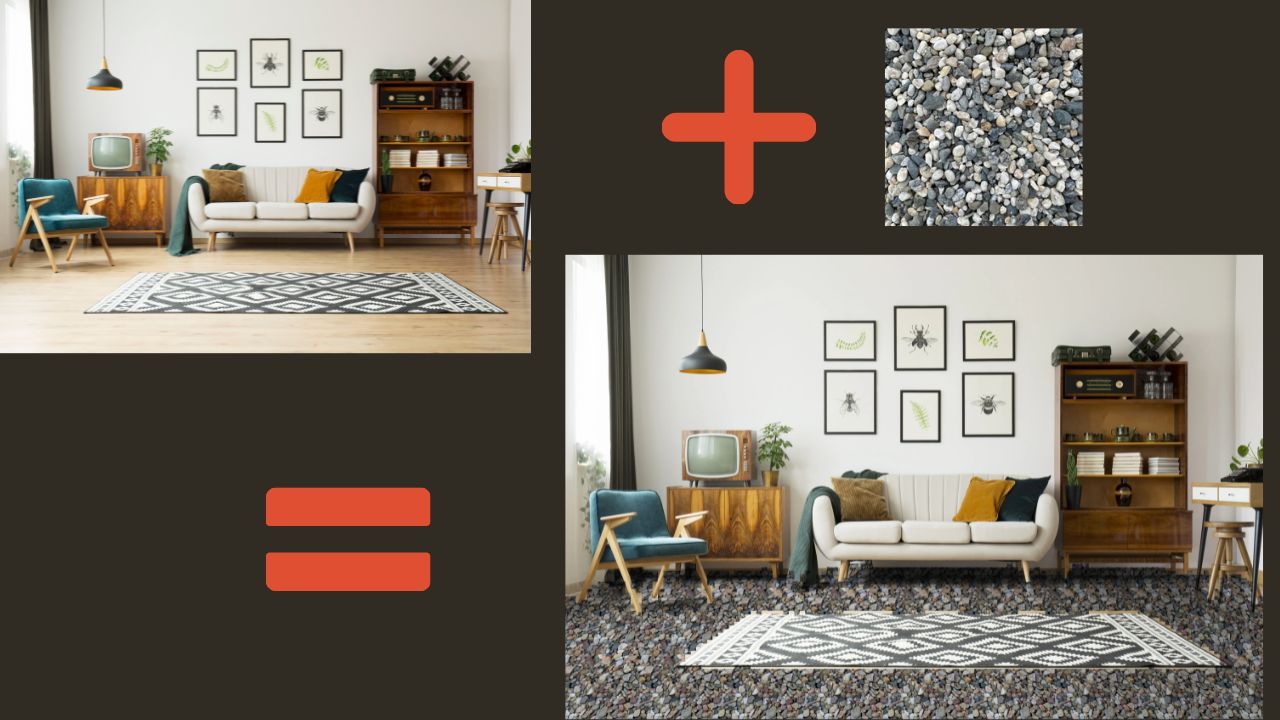
As a developer, I’m always exploring ways to combine deep learning with practical UX-driven interfaces. One weekend project I recently tackled was building a floor visualization tool—something akin to Roomvo or visual tile planners used by interior design platforms.
My version leverages semantic segmentation with SegFormer, OpenCV for texture warping, and a simple Gradio UI. It lets users upload a photo of their room and a tile texture image, then automatically overlays the tile on the floor using perspective transformation.
No manual masking. No 3D models. Just smart segmentation and texture mapping.
🛠️ Tools & Stack
Gradio: For building a clean and fast frontend UI.
Transformers (Hugging Face): Using NVIDIA’s segformer-b2-finetuned-ade-512-512 for segmentation.
Torch: For deep learning inference.
OpenCV: For contour detection, perspective transform, and image warping.
Pillow (PIL): Basic image processing and conversion.
NumPy: Array manipulation and image matrix math.
🧠 Semantic Segmentation with SegFormer
The heart of the project is semantic segmentation. I used SegFormer, a lightweight and fast transformer-based segmentation model trained on ADE20K.
The ADE20K dataset includes common room features like walls, floors, furniture, windows, etc. I filtered for the floor class (index 3) in the segmentation output. This gave me a binary mask of the floor region.
pythonCopyEditsegmentation = outputs.logits.argmax(dim=1).squeeze().cpu().numpy() mask_bin = (segmentation == 3).astype(np.uint8)
🧮 Contour Detection & Perspective Warping
After extracting the floor mask, I identified the largest contour (usually the floor), created a bounding box, and applied a perspective transform to simulate laying the tile at a correct angle.
pythonCopyEditcontours, _ = cv2.findContours(mask_bin, cv2.RETR_EXTERNAL, cv2.CHAIN_APPROX_SIMPLE) contour = max(contours, key=cv2.contourArea) H = cv2.getPerspectiveTransform(src_pts, dst_pts)
The texture is resized and tiled, then warped using OpenCV's warpPerspective() function.
🧪 Lighting Simulation & Blending
One subtle challenge was making the overlaid tile look realistic in the room. Simply pasting the texture didn't work visually.
So I extracted the grayscale lighting from the room and applied it to the texture to simulate light intensity across the floor.
pythonCopyEditlighting = np.clip(room_gray * 1.2, 0, 1) lit_texture = np.clip(texture_float * lighting, 0, 1)
This simple lighting approximation greatly improved visual realism, especially when parts of the floor are shadowed.
🎛️ Frontend with Gradio
Gradio made it super quick to turn this into an interactive web app. Users upload a room image and a tile image, and in seconds, get a 4-step visualization:
Original Room
Floor Mask
Warped Tile Texture
Final Overlay
pythonCopyEditgr.Interface( fn=process, inputs=[gr.Image(), gr.Image()], outputs=[gr.Image(), gr.Image(), gr.Image(), gr.Image()] )
Also added a couple of example URLs for quick testing.
🚀 Live Demo
You can try the live version hosted on Hugging Face Spaces:
👉 https://huggingface.co/ spaces/ sanjaybora04/ floor-visualizer
No login required. Open-source and free to play with.